
"I long to accomplish a great and noble task, but it is my chief duty to accomplish small tasks as if they were great and noble."
-Helen Keller
What I'm reading: HGTV magazine
What I'm writing: Finishing up a new chapter one to YA novel
I have three quick projects from Charlotte's room to share with you today. I promise, just a few more posts of girly and then we'll move on to some other rooms in the house. Honestly it's a little overwhelming when I start looking at pictures of all the things we've done. But I'm following the Fly Lady Mantra and tossing my perfectionism! One post at a time!
First, the cabinet. My mom was pretty dang excited to be getting her first granddaughter. And when Mom is excited, she goes shopping. I was never quite sure what she'd drop off at my house next. And one afternoon she brought me this treasure:
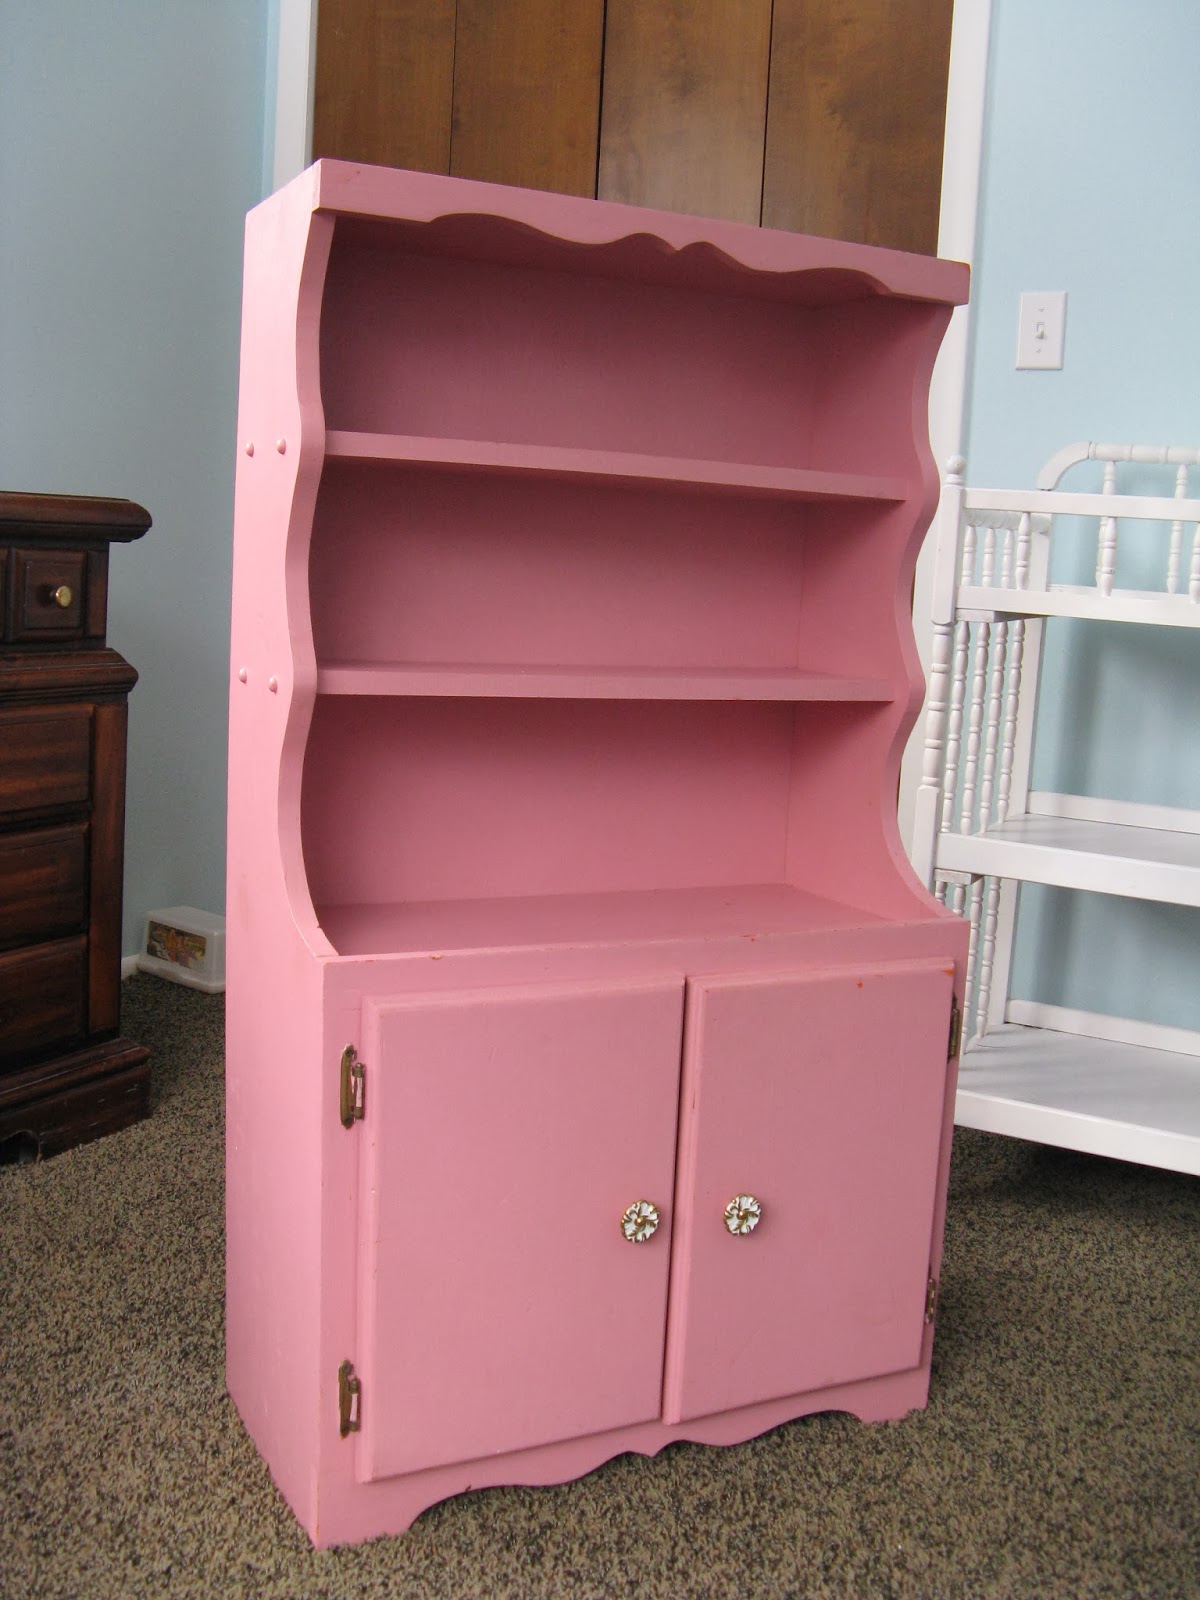
She actually had to fight a lady at the D.I. (the Utah version of Goodwill) to get this cupboard. No fists or anything but there was a little grandma-on-grandma tension. Mom was pretty proud of herself. I think my dad hid behind a rack of shoes until the air cleared.
Now, honestly, it's amazing. It's real, solid wood and is clearly handmade. It reminded me of a little red toy cupboard we had when I was little, that was made by my grandpa. I was already up to my elbows in projects and my due date was approaching and so I tried and tried to convince myself the cupboard was just fine as-is. But. The color. I love pink, but that's the 80's country mauve-rose-pink. With bright orange showing through from the previous paint job. I love some distressed chippy show-through as much as the next girl, but this just wasn't working for me.

I also thought about replacing the hardware, but the more I looked at them, the more I loved the vintage flower knobs.

Finally I decided to just break down and do a make-over. I knew it would bug me every time I looked at it if I didn't. First I disassembled.

Don't you love that bright orange??? Whoever did the pink paint job didn't even take the hardware off. Which left the cool vintage hardware looking like this:

Sad, but nothing a little spray paint won't fix. I decided to go with Brushed Nickel to match the other accents in the room.
Here's a tip when spray painting hardware. Use styrofoam! I just poked all the little screws in a styrofoam block to keep them from rolling around. It also made moving them from place to place much easier. It was February when I worked on this project so I did the painting in the garage and then carried the blocks inside to dry where it was warmer.

I put the knobs up on toothpicks. It worked great.

Meanwhile, the cupboard got three coats of white paint. I didn't prime. I used a cheap foam craft brush for the details and a large bristle paint brush for the rest. This is the same paint we use on our doors and trim. It's Sherwin Williams and is a custom match to the white paint the prior owners used on the trim. We like to keep things easy, yo.

Because it was cold outside and I was getting pretty prego, I just laid painter's plastic on the floor in the nursery and painted it right there. Worked just fine.
After the paint was dry and cured (I gave it a few days just to be sure) I got to work adding my own special pizzazz. I used one of my favorite go-to resources for cheap decorating: wrapping paper. This design came from WalMart. It was the perfect color. And I dig polka dots.

I had never ModPodged furniture before, so I did a lot (way too much) of obsessive reading on the Internet. I finally decided to use ModPodge Hardcoat. I wanted something durable. It worked just like regular ModPodge, only I added multiple coats on top to create a nice finish. My bigger problem was the application.

AAAAGGGHH! I know! I freaked out! As soon as the wrapping paper hit the wet ModPodge, it went all curly and bubbly and did not want to lie flat. And because it's just cheap wrapping paper the more I tried to scrape it down, the more it just peeled off. It was bad, friends.
But. It was just cheap wrapping paper! I took a deep breath and walked away. And did some more obsessive reading on the Internet. Turns out, if you are worried about your paper being too thin to work with the moisture in ModPodge you can spray both sides with a quick coat of clear spray paint. This seals the paper and protects it from warping. So I went back, scraped off the bad news with a plastic Pampered Chef scraper, and tried again. It worked just fine and turned out fabulous.
Here is the finished product:


A few notes on the other items. The amazing wall mirror came with our house. It was above the sink in the utility bathroom. It was way too small for that spot but I loved it. It was a funky yellow-cream color so it got a coat of white spray paint like just about everything else in the room. The small vanity mirror is an antique from my husband's grandmother. The adorable princess piggy bank came from Hobby Lobby (another Grandma splurge). And that little birdbath jewelry holder on top? A gift from my friend Sue, who knows exactly what I like. Everyone needs a friend like Sue!
Next, I knew I needed somewhere to put all her headbands and bows. First, I looked through my stash for something with hooks, and I found this.

My sister-in-law gave me these super cute bee hooks for my birthday several years back. I love them, and we used them for keys in our old house. But since we moved, I hadn't found the perfect place to use them. I especially love the twisted wire wings.

The colors were a little more rustic than I was going for in the new house, and especially in Charlotte's room, but I was afraid of ruining my cute hooks. I worried and fretted for a while, and then I decided to just go for it. So the first thing I did was pull off all the adorable bees.

This was scary. It really was. But they came off really easily. I should know by now that nothing is ever as hard as I make it in my head. Next, I spray painted the entire thing bright white. Then I painted the center section (the part that was off-white) a light pink. The color is Glidden- Pink Peony. It was a paint sample I got for free during a promotion. I just did it by hand, without taping the edges, and used the brush built in to the sample bottle. I gave the bees a quick dose of spray glitter and re-attached them. Ta da! Worked great, and I love them even more than before.


Finally, a bow holder. I know there are billions and billions of tutorials, so I won't go into details here. I thought you might enjoy the before and after, though.
Before: Old thrift-store frame. Dark brown wood, really (not!) beautiful gold painted trim. This is after I removed the cardboard from the center.

After: A coat of white spray paint on the frame. Pink fabric stretched over existing cardboard and attached with hot glue. Then I raided my ribbon stash. I did use the same brown ruffled ribbon to tie in with the lamp. I just attached those with hot glue too and reassembled.

Here it is all loaded up.

The hamper at the bottom is an antique I found at the DI. It's in perfect condition and I love its groovy vibe. It's full of dress-up clothes.

And there you have it! Three fun projects using items I already had (except for the wrapping paper). The baby headbands are gone so we use the hooks for dress-up purses. I love that we still use these items as Charlotte gets bigger, just for different things. That's the best kind of project.


.JPG)
.JPG)
.JPG)
.JPG)

.JPG)
.JPG)